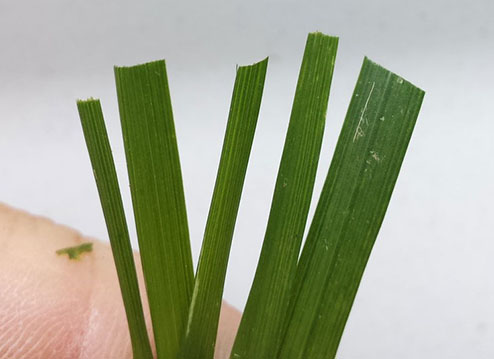
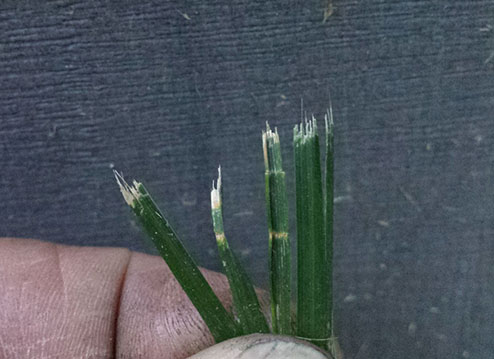
Begin by determining if your lawn mower’s blades are dull…
The biggest indicator of a worn out blade is a rough uneven cut in the grass after mowing. That is because a dull blade will tear grass rather than slicing it. Torn grass is easy to spot with rough, dead edges, and often times dead patches due to an increased likelihood for infection. Other signs of a worn blade include difficulty with cutting wet or tall grass. A sharp blade will leave grass completely green with cleanly sliced edges for a greener, healthier lawn. If your mower no longer cuts grass as it should, it may be time to either replace or sharpen its blades.
DULL BLADE
Is it time to replace the blades?
This is a difficult question to answer due to the fact that a multitude of factors play into determining whether or not a blade can be sharpened. The first step you must take involves removing the blades from your mower. This can be a dangerous process without the proper precautions so begin by wearing thick gardening gloves to avoid cutting your hands. Here is a short breakdown of how to remove your mower’s blades.
Step 1: Detach the Spark Plug
Read the owner’s manual for your specific model and find the location of the spark plug. Detach the spark plug’s wire to ensure that the engine will not start the blades while you are trying to remove or reattach them. This should be done while the mower is still on its four wheels right side up.
Step 2: Lay the Mower Down
Slowly tilt the mower onto its side so that the air filter is on top of the engine and oil tanks. If you tilt your mower the other way, gravity will cause gas to drip down into the filter causing damage and potentially a broken filter. Keep a towel or newspapers under the tilted mower to catch any dripping liquids.
Step 3: Mark the Blade
From this position you should be able to access the bolt keeping the blade in place. But before you begin removing it, use a marker to mark the face-up side of the blade. This is important for you to know which side needs to be facing up when reinstalling the blade. A backwards blade will be incapable of mowing so make sure that you do not skip this step.
Step 4: Remove the Blade
Use a wrench to turn the bolt counterclockwise until the blade comes off. Keep your free hand firmly on the blade so that it does not fall off and get damaged. Once you have removed the blade you will be able to determine whether or not it needs to be replaced. An old bolt that has not been maintained will most likely be rusted tightly onto the nut and will be difficult to remove. If this is the case, try wedging a metal or wooden rod underneath the blades to provide leverage. Also try applying a machining oil like WD-40 or lubricant onto the nut and bolt.
Sharpen or Replace?
If you are a beginner, it may be difficult to determine whether or not to replace your lawn mower’s blades. Use the criteria below to make a decision, but if you are unsure, take the blades to a local home depot or similar store and they will inspect your blades for free. The following signs are direct indicators of a damaged blade that needs replacement:
- Cracks: This is the easiest sign to spot as they are clear to see even for beginners. Any amount of cracking is dangerous for both the mower and user. These blades must undoubtedly be replaced.
- Chips: Micro-chips along the blade’s edge may form from small pebbles, twigs, and many other common lawn debris. A few small chips are usually not a problem and can be grinded out with a filer. Several bigger chips are an indicator that the blade must be replaced.
- Bends: A blade that has been dented will no longer be straight and will take on a bent form. Place your blade on a flat surface to determine whether or not it is still straight. A dented blade will be unevenly balanced and mow grass inefficiently.
- Thin Edge: The opposite side of the sharp cutting edge is known as the trailing edge or fin. A new blade will feature a thick fin that is slightly curved upwards to create lift. Over time the fin will wear down with use and become thin and delicate. If your blades fin is thin and eroded, it may be time to replace the blade
If your blade has worn down and needs to be replaced, check out our article on mulching blades. It covers vital information on different types of blades and the specific functionality of each.
How to Sharpen Lawn Mower Blades
To sharpen lawn mower blades you will need a vise and a mill bastard file. Start by sliding the blade into the vise with the cutting edge facing out for easy access. Twist the vise and clamp the blade firmly in place. Firmly hold the filer with one hand on the handle and the other hand on the opposite side. Determine which side of the cutting edge to file by looking at which side was originally angled. The side with an edge that is flush against the blade will not be the filing side. Run the file against the top side of the edge with a pushing motion. Remember that it is vital to file in a single direction only. Angle the file so that it is parallel with the original cutting edge. Use long pushing strokes making sure to feel the steel being ground. Keep refining the edge until it is about as sharp as a butter knife – a sharper edge will wear down much faster and provide little benefit.
If using a filer is outside of your comfort zone, we recommend that you try a lawn mower blade sharpener. They are cheap and easy to use with a design meant specifically for beginners. They can be ordered online or found in most home stores. We recommend the…
Smith’s 50603 Mower Blade Sharpener
This is the best lawn mower blade sharpener that we found from our research. It is designed to sharpen dull blades with a few quick pulls and will greatly reduce the amount of time required to sharpen blades. Featuring a large safety guard and easy-to-grip, ergonomic handles, Smith’s 50603 Blade Sharpener is easy to use even for an absolute beginner.


